LABORATORIO 1
*El objetivo de este laboratorio es controlar 8 LEDS desde el Arduino, un LED encendido que se mueve en forma continua de izquierda a derecha.
Herramientas:
-1 computador
-software "arduino"
-software "fritzing"
-Hardware Arduino UNO
-8 Leds
-8 Resistencias
-Protoboard
-alambre para protoboard
- Código Arduino
int led [8]={3,4,5,6,7,8,9,10};
// the setup routine runs once when you press reset:
void setup() {
for(int i=0;i<8;i++)
pinMode(led[i], OUTPUT);
}
void setup() {
for(int i=0;i<8;i++)
pinMode(led[i], OUTPUT);
}
// the loop routine runs over and over again forever:
void loop() {
for(int i=0;i<8;i++)
proceso(i);
for(int i=6;i>0;i--)
proceso(i);
}
void loop() {
for(int i=0;i<8;i++)
proceso(i);
for(int i=6;i>0;i--)
proceso(i);
}
void proceso(int i)
{
digitalWrite(led[i], HIGH); // turn the LED on (HIGH is the voltage level)
delay(10); // wait for a second
digitalWrite(led[i], LOW); // turn the LED off by making the voltage LOW
delay(50); // wait for a second
}
{
digitalWrite(led[i], HIGH); // turn the LED on (HIGH is the voltage level)
delay(10); // wait for a second
digitalWrite(led[i], LOW); // turn the LED off by making the voltage LOW
delay(50); // wait for a second
}
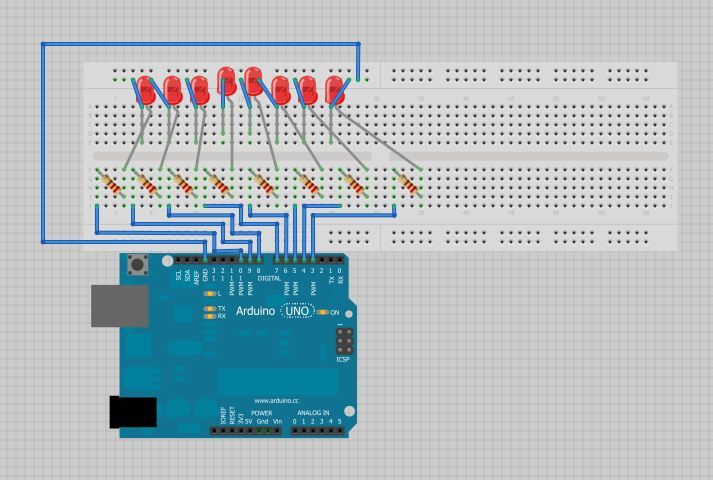
- Diagrama en Protoboard

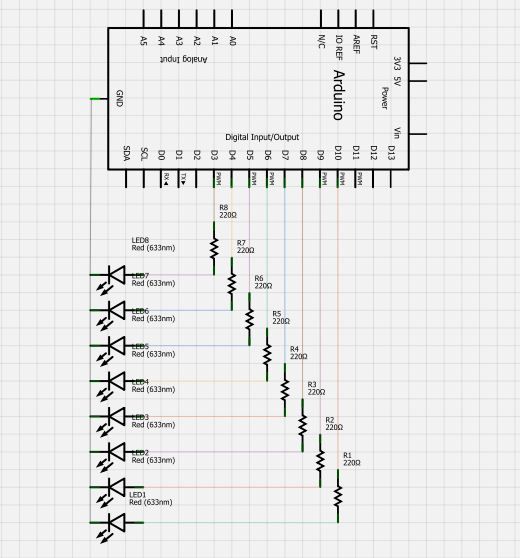
- Diagrama Esquemático

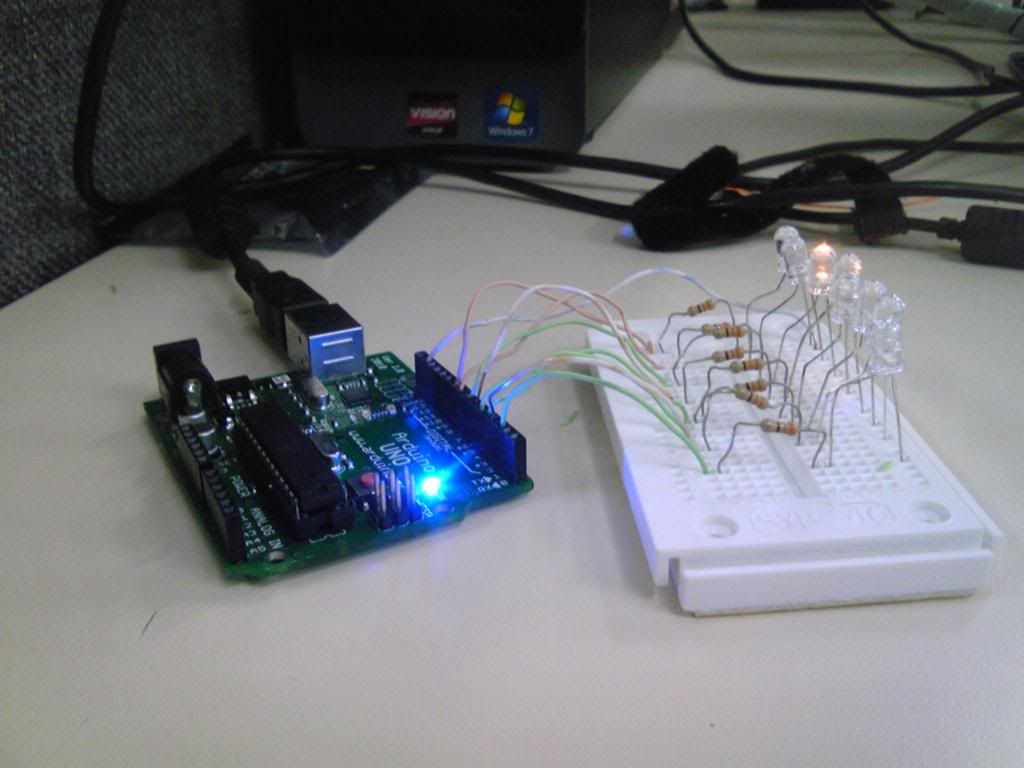
- Imagen del Montaje

- Vídeo del Funcionamiento
LABORATORIO 2
El objetivo de este laboratorio es Controlar 6 LEDS desde el Arduino, un LED encendido que se mueve de izquierda a derecha según la posición del
Potenciómetro.
Potenciómetro.
Herramientas:
-1 computador
-software "arduino"
-software "fritzing"
-Hardware Arduino UNO
-6 Leds
-6 Resistencias
-1 Potenciometro
-Protoboard
-alambre para protoboard
-Código Arduino
int led [6]={2,3,4,5,8,10};
int i;
int x;
int i;
int x;
// the setup routine runs once when you press reset:
void setup() {
pinMode(A1, INPUT);
for(int i=0;i<6;i++)
pinMode(i, OUTPUT);
}
// the loop routine runs over and over again forever:
void loop() {
x= analogRead(A1);
i=map(x,0,1023,0,5);
proceso(i);
}
void proceso(int i)
{
digitalWrite(led[i], HIGH); // turn the LED on (HIGH is the voltage level)
//delay(10); // wait for a second
digitalWrite(led[i], LOW); // turn the LED off by making the voltage LOW
//delay(50); // wait for a second
}
- Diagrama en Protoboard

- Diagrama Esquemático

- Imagen del Montaje

No hay comentarios:
Publicar un comentario